Introducing The Mason Jar Salad
I’ll admit it—my workday lunches can get pretty boring. I always think I’m going to finally make use of all those delicious recipes I see but then nighttime rolls around and I’m too busy watching really important things like Madmen & Downtown Abby. Then morning comes, and I’m running around like a headless chicken and I’m lucky if I remember my keys (and more importantly my kids) & I’m on my way out the door, let alone find time to throw a tasty lunch together.
But with a teensy amount of planning, I've learned that delicious (and healthy) lunches can be just a few easy steps away. All it takes is a trip to the grocery store on a Saturday afternoon, a couple pantry staples, some mason jars, and an hour of your time.
Why mason jars, you might ask? Despite the obvious cuteness factor, these jars will keep your greens fresher than fresh, they won’t stain, they’re BPA free, microwave and dishwasher safe, perfectly sized for salads for one, won’t leak, travel well, and are reusable. Convinced? Yes, I thought so!
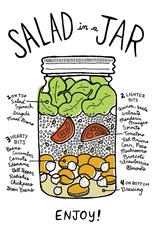
There really are only two rules to the mason jar salad: Start with the dressing or sauce, and end with the lettuce and herbs. However you want to layer the rest of the ingredients—try different meats, beans, lettuces, cheeses, vinaigrettes, or sauces—it is up to you (though I usually layer by weight so heavier items, like tomatoes, are on the bottom).
The best part is you can make five salads at a time, and they’ll stay fresh for the whole week—just grab and go on your way out the door! When lunchtime rolls around, you’ll be sitting pretty with your delicious salad ready to be shaken up.
To get you going, check out this recipe with the ingredients listed in layering order.
Happy lunching!
But with a teensy amount of planning, I've learned that delicious (and healthy) lunches can be just a few easy steps away. All it takes is a trip to the grocery store on a Saturday afternoon, a couple pantry staples, some mason jars, and an hour of your time.
Why mason jars, you might ask? Despite the obvious cuteness factor, these jars will keep your greens fresher than fresh, they won’t stain, they’re BPA free, microwave and dishwasher safe, perfectly sized for salads for one, won’t leak, travel well, and are reusable. Convinced? Yes, I thought so!
There really are only two rules to the mason jar salad: Start with the dressing or sauce, and end with the lettuce and herbs. However you want to layer the rest of the ingredients—try different meats, beans, lettuces, cheeses, vinaigrettes, or sauces—it is up to you (though I usually layer by weight so heavier items, like tomatoes, are on the bottom).
The best part is you can make five salads at a time, and they’ll stay fresh for the whole week—just grab and go on your way out the door! When lunchtime rolls around, you’ll be sitting pretty with your delicious salad ready to be shaken up.
To get you going, check out this recipe with the ingredients listed in layering order.
Happy lunching!
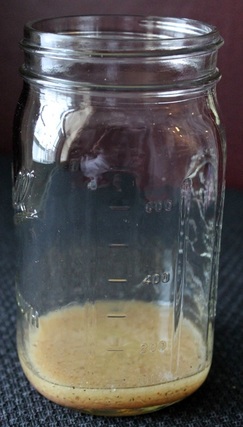
Layer 1: The Dressing
The first layer of the mason jar salad is always the dressing. You can use any type of dressing you like. I prefer a vinaigrette dressing or oil & vineger but it will work with creamy ranch or blue cheese. It completely depends on your preference. Keep in mind that the vinaigrette dressing will come out of the mason jar easier. If you use a thicker dressing you will have to give it a good shake and probably use your fork to scrape it out.
I use about 2 tablespoons of dressing.
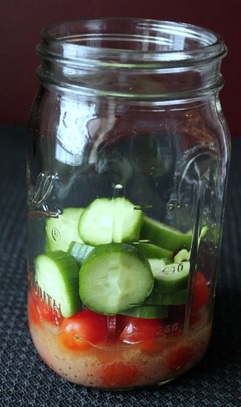
Layer 2: Hearty Vegetables
This layer is very important because it is used to shield the dressing from the lettuce and other vulnerable ingredients. In this layer you would use vegetables that can hold up to being in dressing for a week. Vegetables I use are tomatoes, cucumbers, red onion, broccoli, cauliflower, asparagus, celery, carrots, peppers, and any other hearty vegetable you like.
Layer 3: Beans and Other Less Hearty Vegetables
This layer is where you will put beans and other less hearty vegetables like mushrooms, zucchini, sprouts, green beans, corn etc if you choose to use them. If you are using an avocado then that would be in this layer as well. Basically, this layer acts as a second defense between the dressing and lettuce. You don’t want this layer marinating in the dressing but it will be fine should some of the ingredients get exposed.
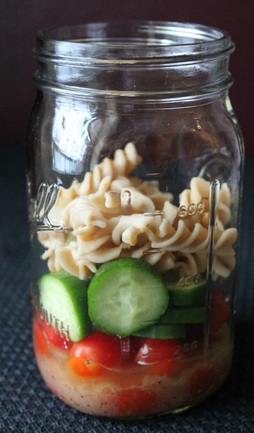
Layer 4: Pasta and Grain Layer
This layer is where you add your pasta and/or other grain if you choose. At this point the other 1-2 layers should keep the dressing away from this layer. However, if by some chance dressing does make its way to this layer no worries everything should be fine. For pasta and grains you can use any type of pasta, rice, couscous, and/or quinoa. Really anything would work so get creative.
This layer is where you add your pasta and/or other grain if you choose. At this point the other 1-2 layers should keep the dressing away from this layer. However, if by some chance dressing does make its way to this layer no worries everything should be fine. For pasta and grains you can use any type of pasta, rice, couscous, and/or quinoa. Really anything would work so get creative.
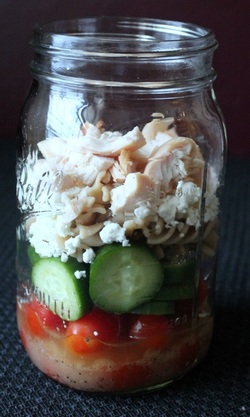
Layer 5: Protein and Cheese
In this layer I put meat, eggs, and cheese. I keep these ingredients away from the dressing because they do not do well sitting in dressing for a several days.. If you are using shrimp or other seafood I would add those ingredients to this layer. For cheese, I have used blue cheese crumbles, feta cheese, goat cheese, shredded cheese, and cubed cheese in my mason jar salad. Each of them work really well & taste delicious.
In this layer I put meat, eggs, and cheese. I keep these ingredients away from the dressing because they do not do well sitting in dressing for a several days.. If you are using shrimp or other seafood I would add those ingredients to this layer. For cheese, I have used blue cheese crumbles, feta cheese, goat cheese, shredded cheese, and cubed cheese in my mason jar salad. Each of them work really well & taste delicious.

Layer 6: Lettuce, nuts, and seeds.
In this last layer you want to put ingredients that would wilt or become to soft and soggy if exposed to dressing to soon. This definitely includes any type of lettuce or green. I also include nuts in this layer because I have found that the nuts at times lose their crunch if they are to close to the first layer. My favorite greens to use are arugula, baby spinach, and field greens. But of course you can use whatever you prefer.
In this last layer you want to put ingredients that would wilt or become to soft and soggy if exposed to dressing to soon. This definitely includes any type of lettuce or green. I also include nuts in this layer because I have found that the nuts at times lose their crunch if they are to close to the first layer. My favorite greens to use are arugula, baby spinach, and field greens. But of course you can use whatever you prefer.
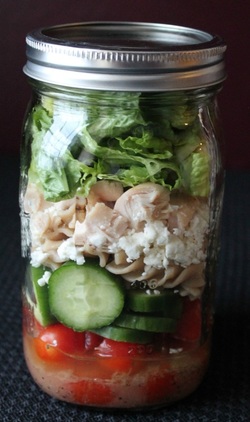
After you fill the mason jar with the different salad layers you just put the top on and close tight.
There is really no rule with the amount of ingredients to put in each layer or that you must include all layers. The most important layer is layer 2 with the hearty veggies. You want to make sure to have enough ingredients to keep the dressing and lettuce away from each other. If you are concerned with calories or the nutritional information in the mason jar salads you can always calculate that information ahead of time using The LoseIt App. I'll show you how to do that in this video.
There is really no rule with the amount of ingredients to put in each layer or that you must include all layers. The most important layer is layer 2 with the hearty veggies. You want to make sure to have enough ingredients to keep the dressing and lettuce away from each other. If you are concerned with calories or the nutritional information in the mason jar salads you can always calculate that information ahead of time using The LoseIt App. I'll show you how to do that in this video.
If you would like to watch a “how to” video on making a mason jar salad as well as make ahead breakfasts & snacks check out the one below. It is easy to follow and shows you exactly how to put these recipes together. Enjoy your new lunches!